OpenCPN, selon Shoreline
OpenCPN, selon Shoreline |
| Plan du
site ---> Les compléments
---> Routage météorologique |
| P_19_A | Routage météo (Weather-Routing), Généralités. |
| Validité : 4.8 |
| Météo-Routage
Généralité |
Météo-Routage Aide | Polaires | Causes de disfonctionnement |
|
|
Up |
| Avertissements : |
|
Up |
| 1°
A quoi sert ce complément ? |
|
Up |
| 2° Mise en place : |
| Téléchargement,
installation : |
|
Up |
|
Up |
|
Up |
| Fond
de carte GshhsHiRes : |
|
Up |
|
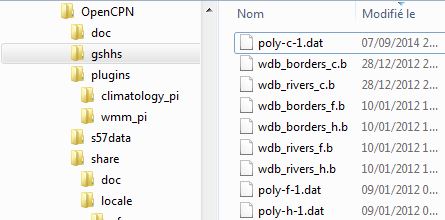
Ci
dessous, contenu du dossier gshhs sans le fond de carte détaillé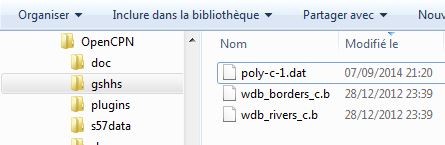 A droite, même dossier, avec fond de carte détaillé inclus. |
 |
Up |
| Activation/Désactivation
: |
|
  |
Up |
|
Up |
|
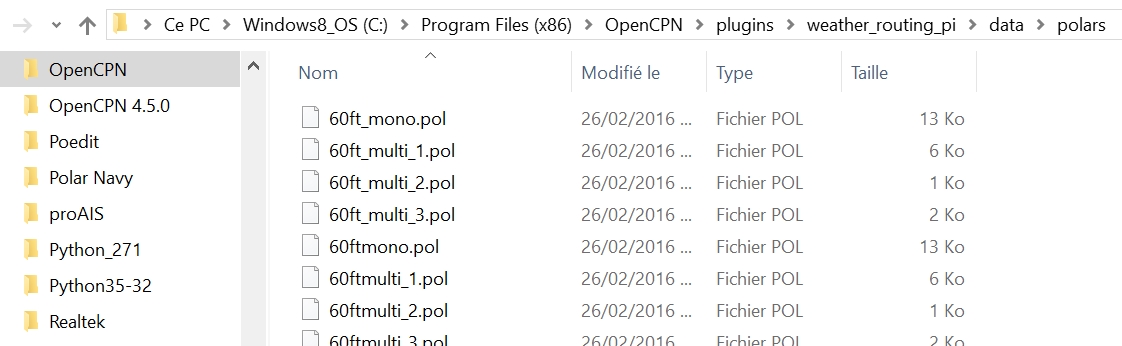
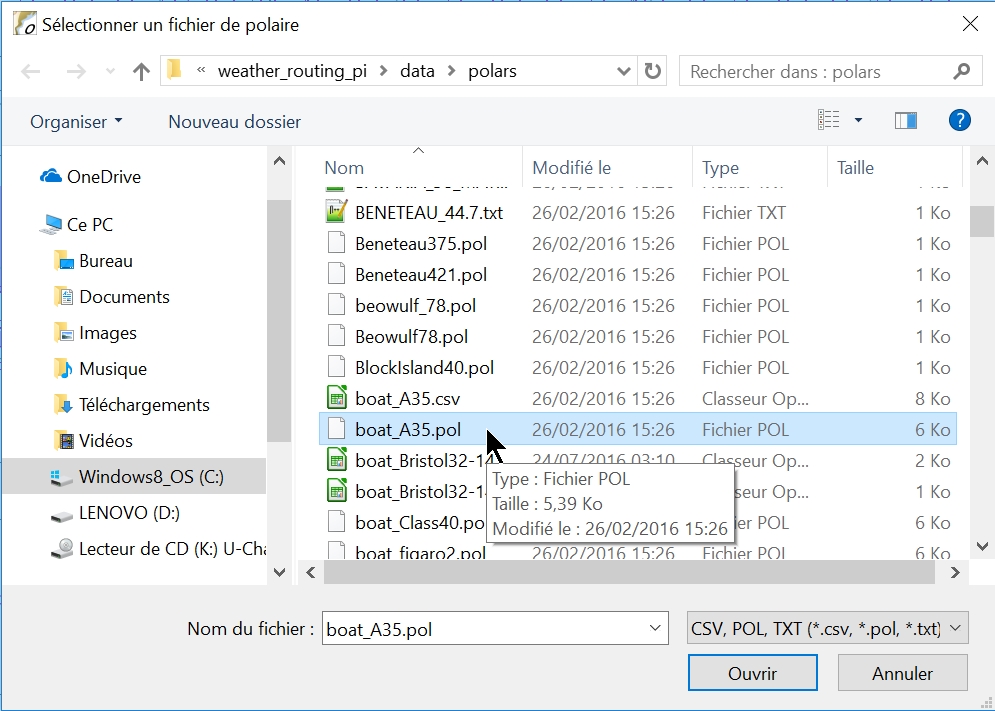
| Où sont les fichiers de polaires dans votre PC ou votre tablette ? |
|
Up |
| 3° Fonctionnement
du complément : |
| Démarrer
ou quitter le complément : |
|
 |
|
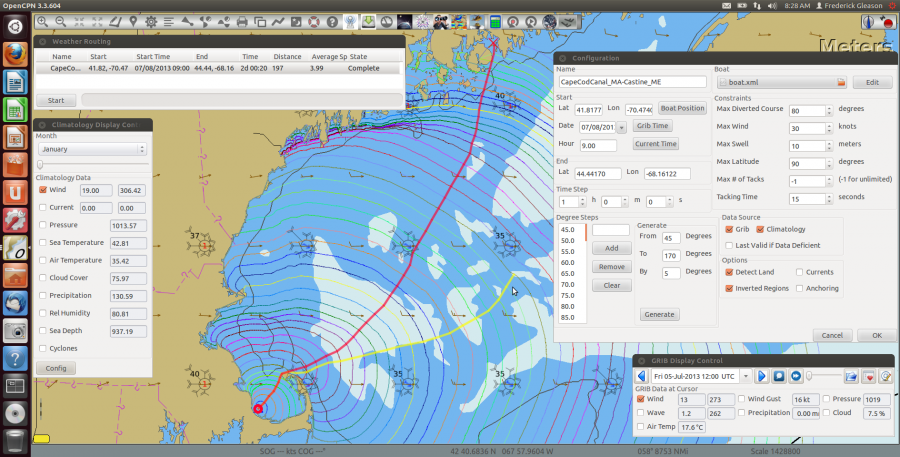
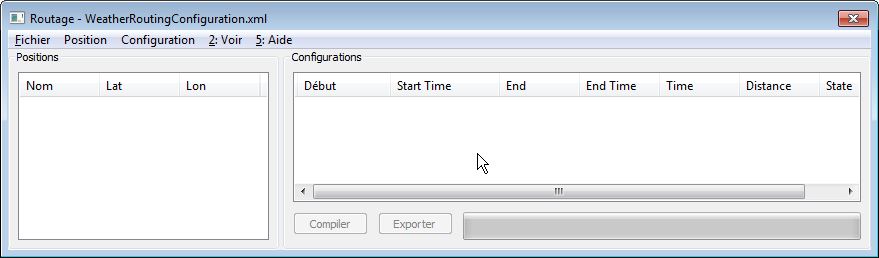 Ci dessus la fenêtre principale du complément, telle qu'elle s'ouvre la première fois. |
Up |
|
|
||
| Le
principe général : |
|
Up |
| Le principe général plus détaillé : |
|
Up |
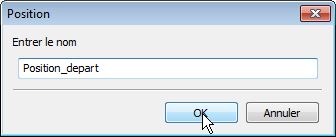
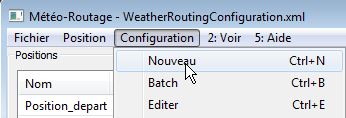
| 4° Les points de routage : |
| Créer
un point de routage : |
|
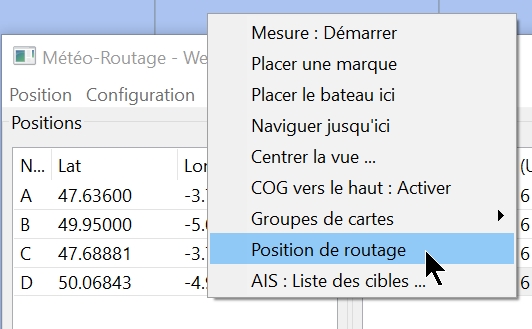 |
Up |
 |
Up |
|
|
||
|
 |
Up |
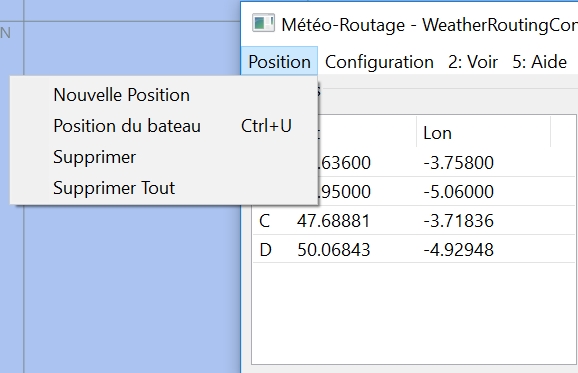
| Supprimer
un ou plusieurs point(s) de routage : |
|
|
Up |
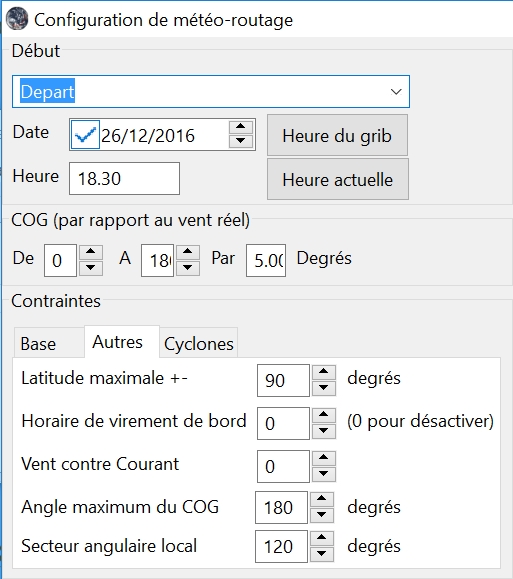
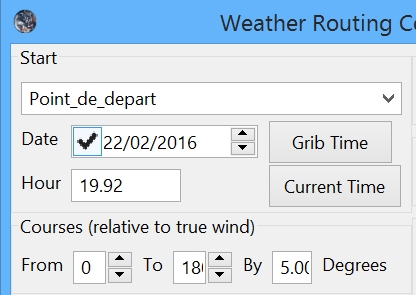
| 5° La fenêtre de configuration, partie gauche : |
| Partie gauche, le haut pour commencer : |
|
 |
Up |
| Partie gauche, le bas, onglet "Base" : |
|
 |
Up |
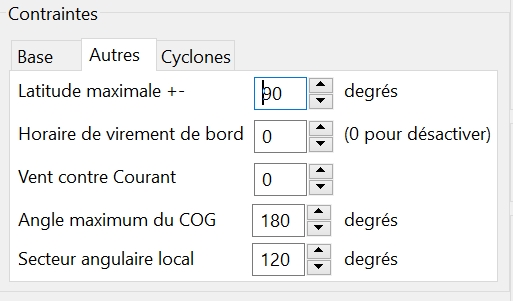
| Partie gauche, le bas, onglet "Autres" : |
|
 |
Up |
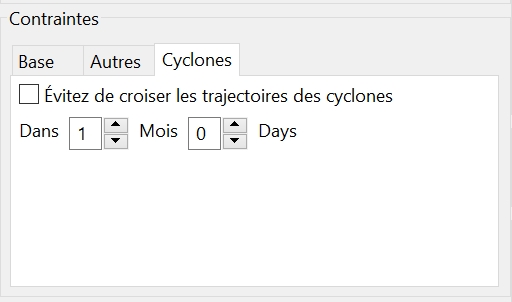
| Sa partie gauche, le bas, onglet "Cyclones" : |
|
 |
Up |
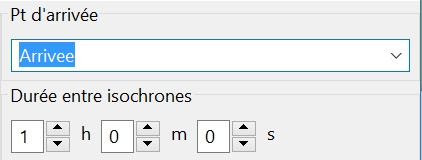
| 6° La fenêtre de configuration, partie droite : |
| Partie droite, le haut , "Point d'arrivée" et "Durée entre isochrones" : |
|
 |
Up |
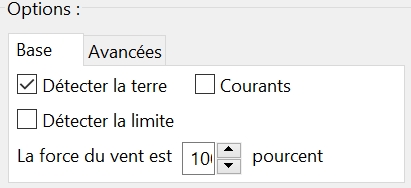
| Partie droite, zone "Options", onglet "Base" : |
|
 |
Up |
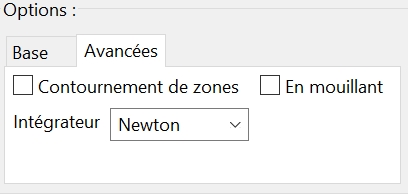
| Partie gauche, zone "Options", onglet "Avancées" : |
|
 |
Up |
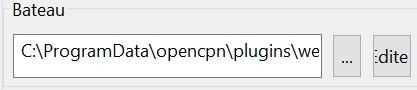
| Partie droite, zone "Bateau" : |
|
 |
Up |
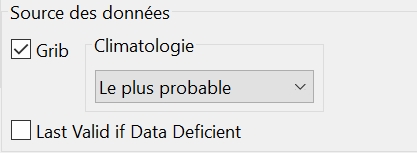
| Partie droite, zone "Source de données" : |
|
 |
Up |
| 7° Définir un bateau : |
| La bateau par défaut : |
|
Up |
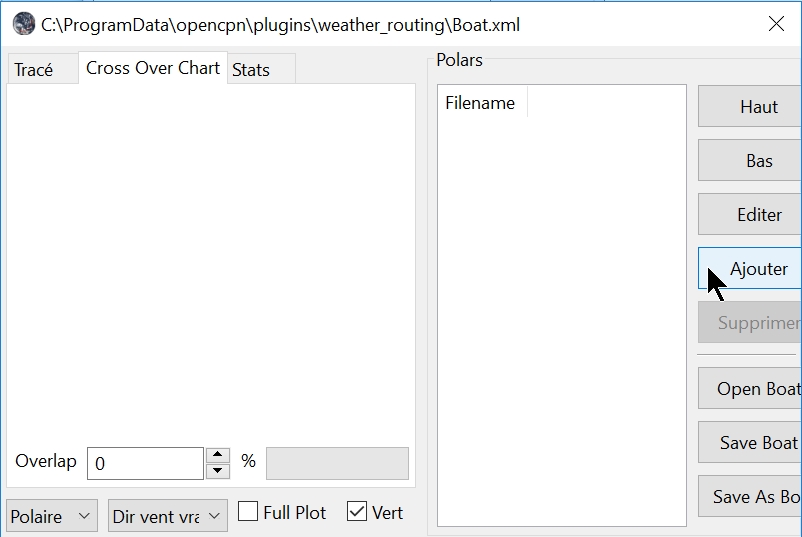
| Définir
d'un bateau personnalisé : |
|
Up |
 |
Up |
|
|
 |
Up |
|
|
 |
|
|
Up |
|
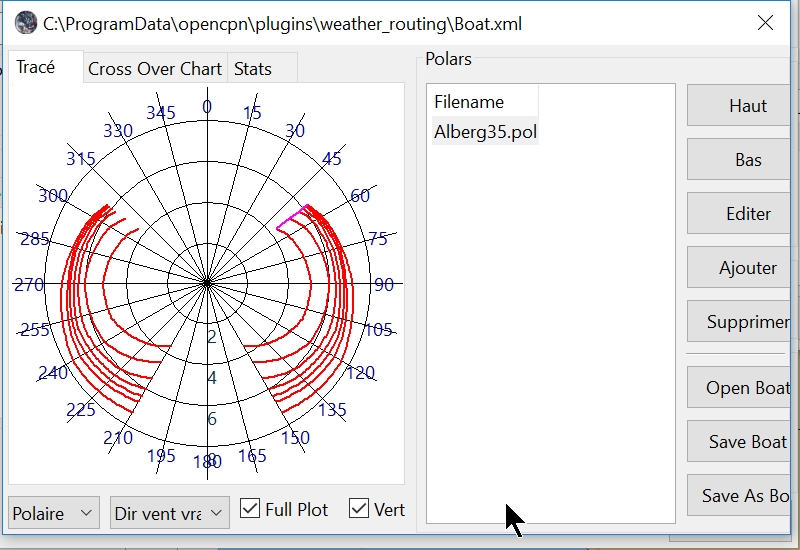
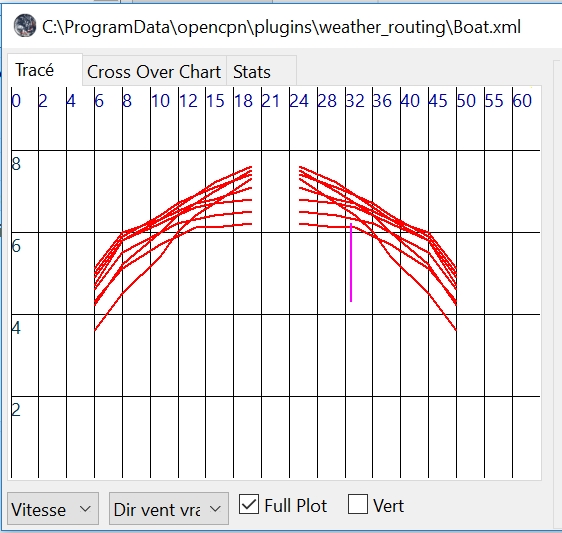
| Comprendre le bateau qui a été défini : |
|
Up |
|||||||||||||||||||||||||||||||||||||||||||||||||||||||||||||||||||||||||
|
 |
Up |
||||||||||||||||||||||||||||||||||||||||||||||||||||||||||||||||||||||||
|
 |
Up |
||||||||||||||||||||||||||||||||||||||||||||||||||||||||||||||||||||||||
|
|
Up |
||||||||||||||||||||||||||||||||||||||||||||||||||||||||||||||||||||||||
| Onglet
"bateau" : |
|
|
Up |
| 8° Les météo-routes : |
| Créer
une météo-route : |
|
 |
Up |
|
 |
Up |
|
||
|
Up |
|
|
||
|
Up |
|
|
||
|
Up |
|
Up |
|
|
||
|
Up |
|
|
||
|
||
|
||
|
Up |
|
|
||
| Créer
plusieurs météo-routes : |
|
Up |
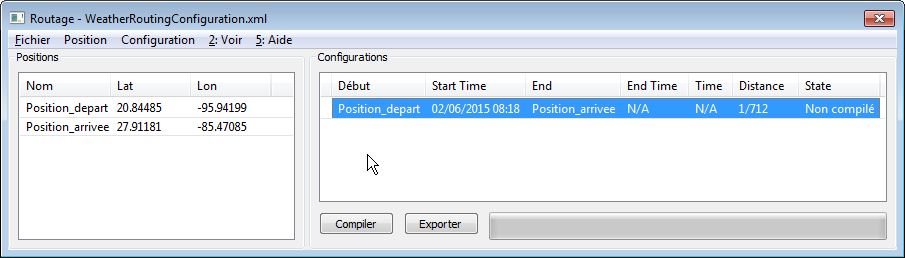
| 9° Compilation : |
|
Up |
|
 |
Up |
|
 |
Up |
|
|
Up |
|
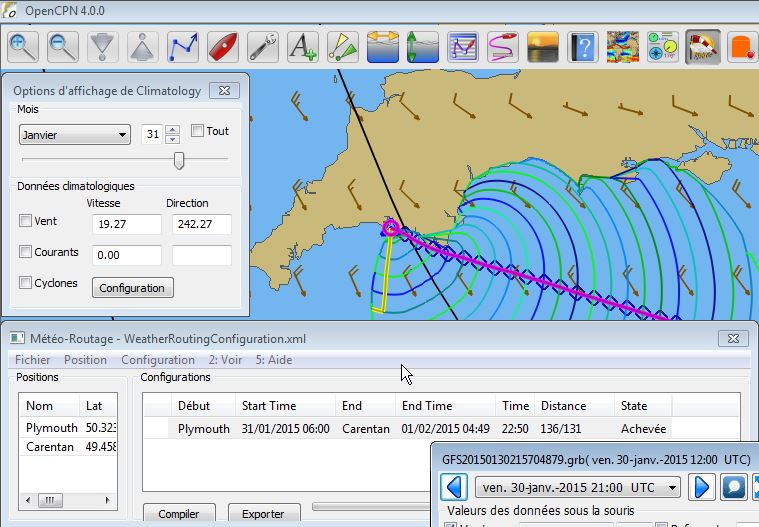
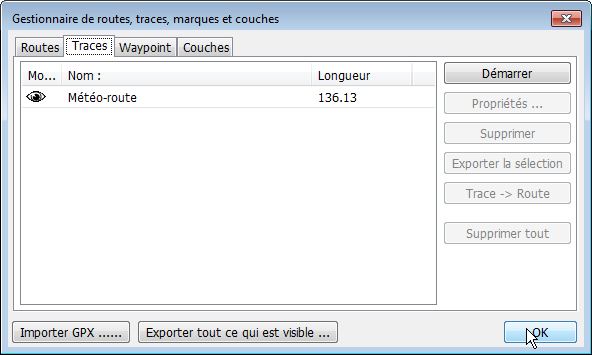
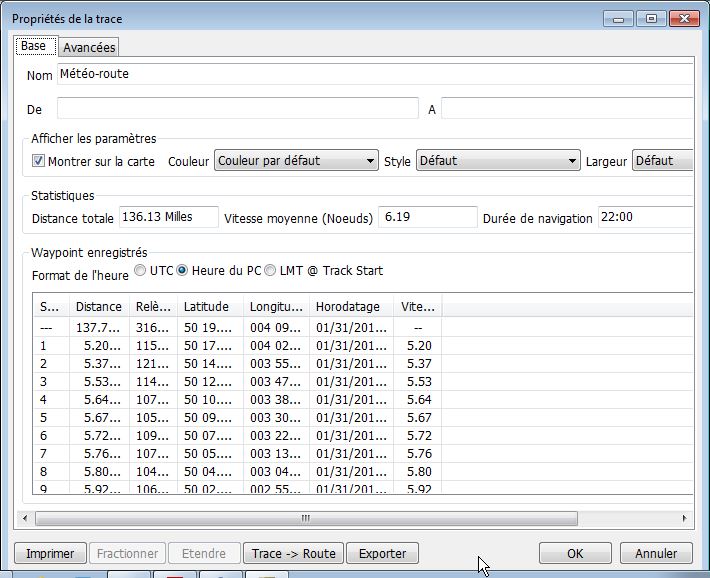
| 10° Exporter la trace |
|
Up |
|
|
 |
|
|
 |
Up |
|
 |
Up |
| 11° Compilations
multiples : |
|
Up |
|
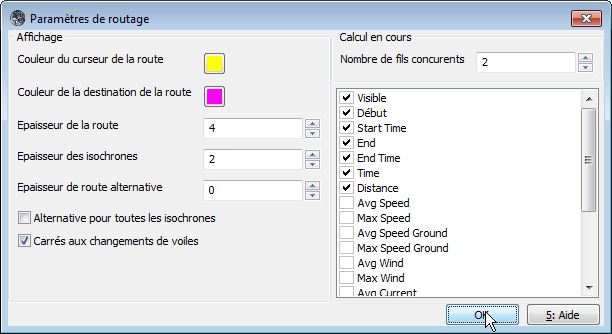
| 12° Pour satisfaire votre curiosité : |
| Item
"Voir", Paramètres : |
|
|
Up |
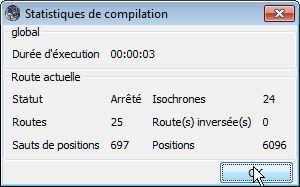
| Item
"Voir", Statistiques : |
|
 |
Up |
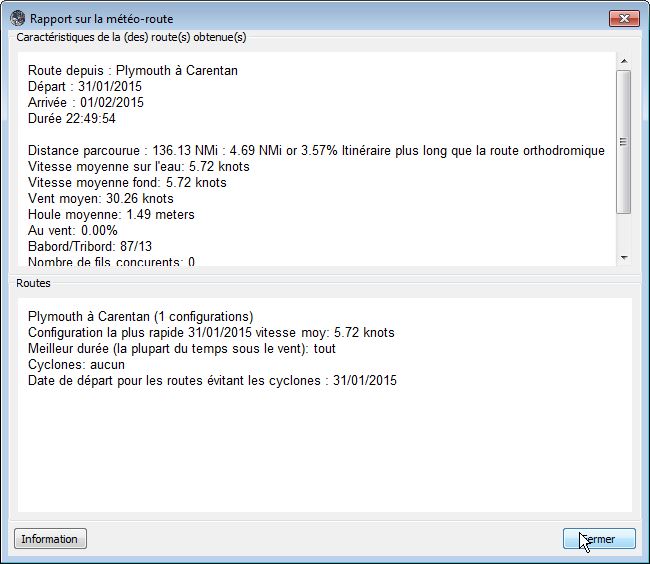
| Item
"Voir", Rapport : |
|
 |
Up |
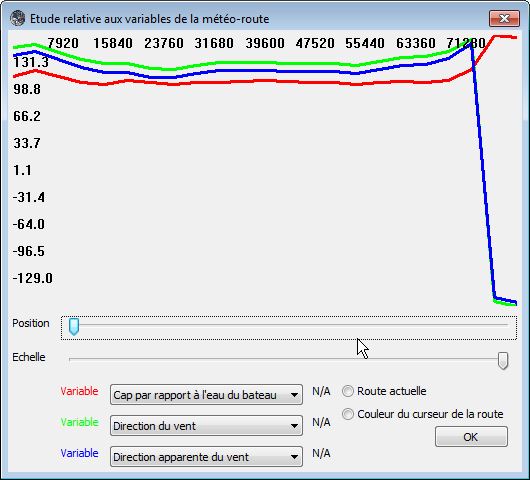
| Item
"Voir", Tracés : |
|
 |
Up |
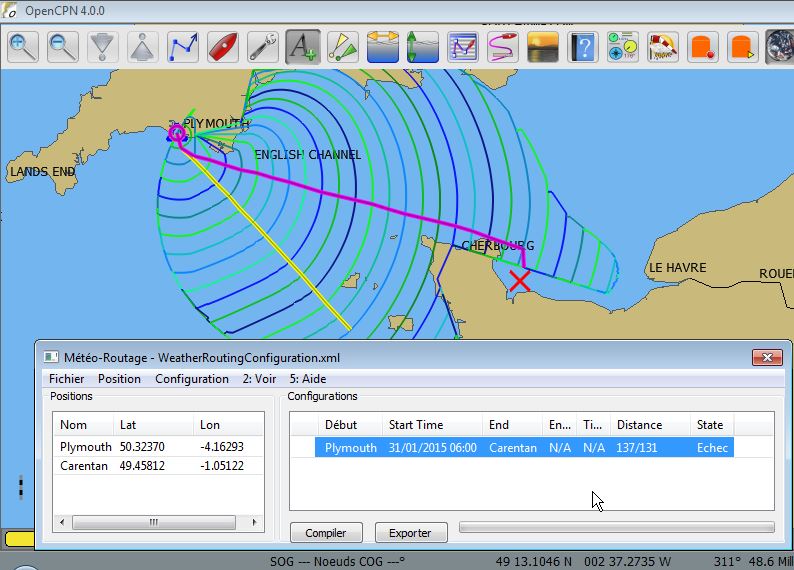
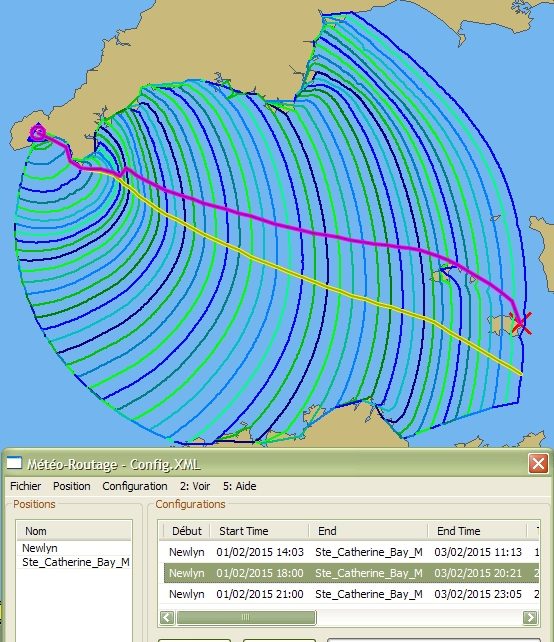
| 13° Des exemples de météo-routes : |
|
Up |
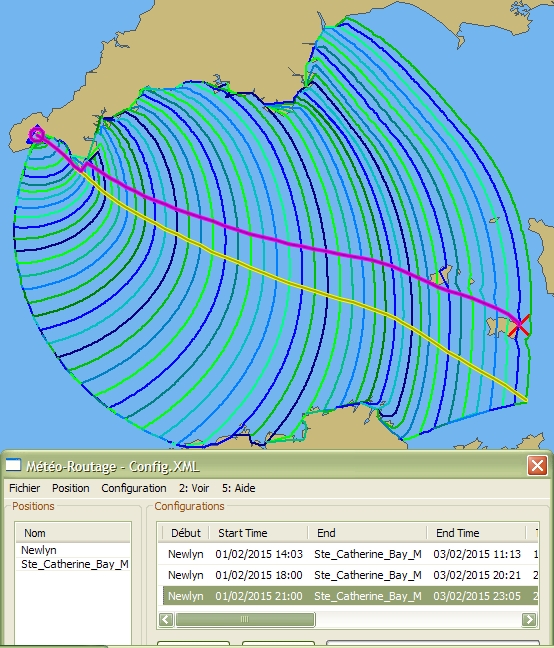
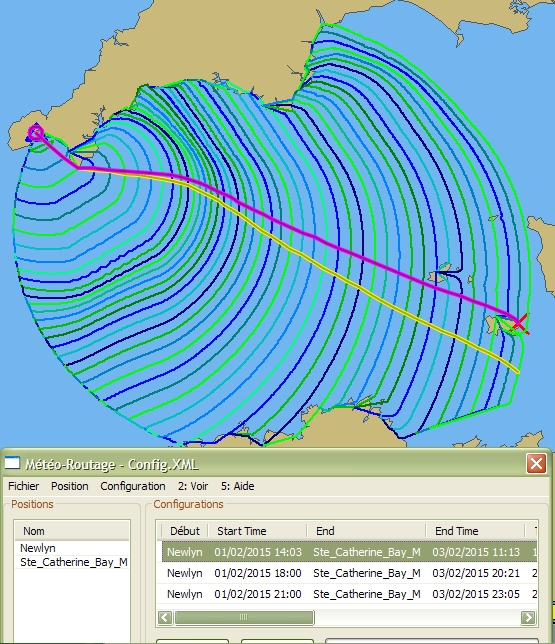
| Avec des horaires différents au départ : |
|
Up |
|
 |
Up |
|
 |
Up |
|
|
Up |
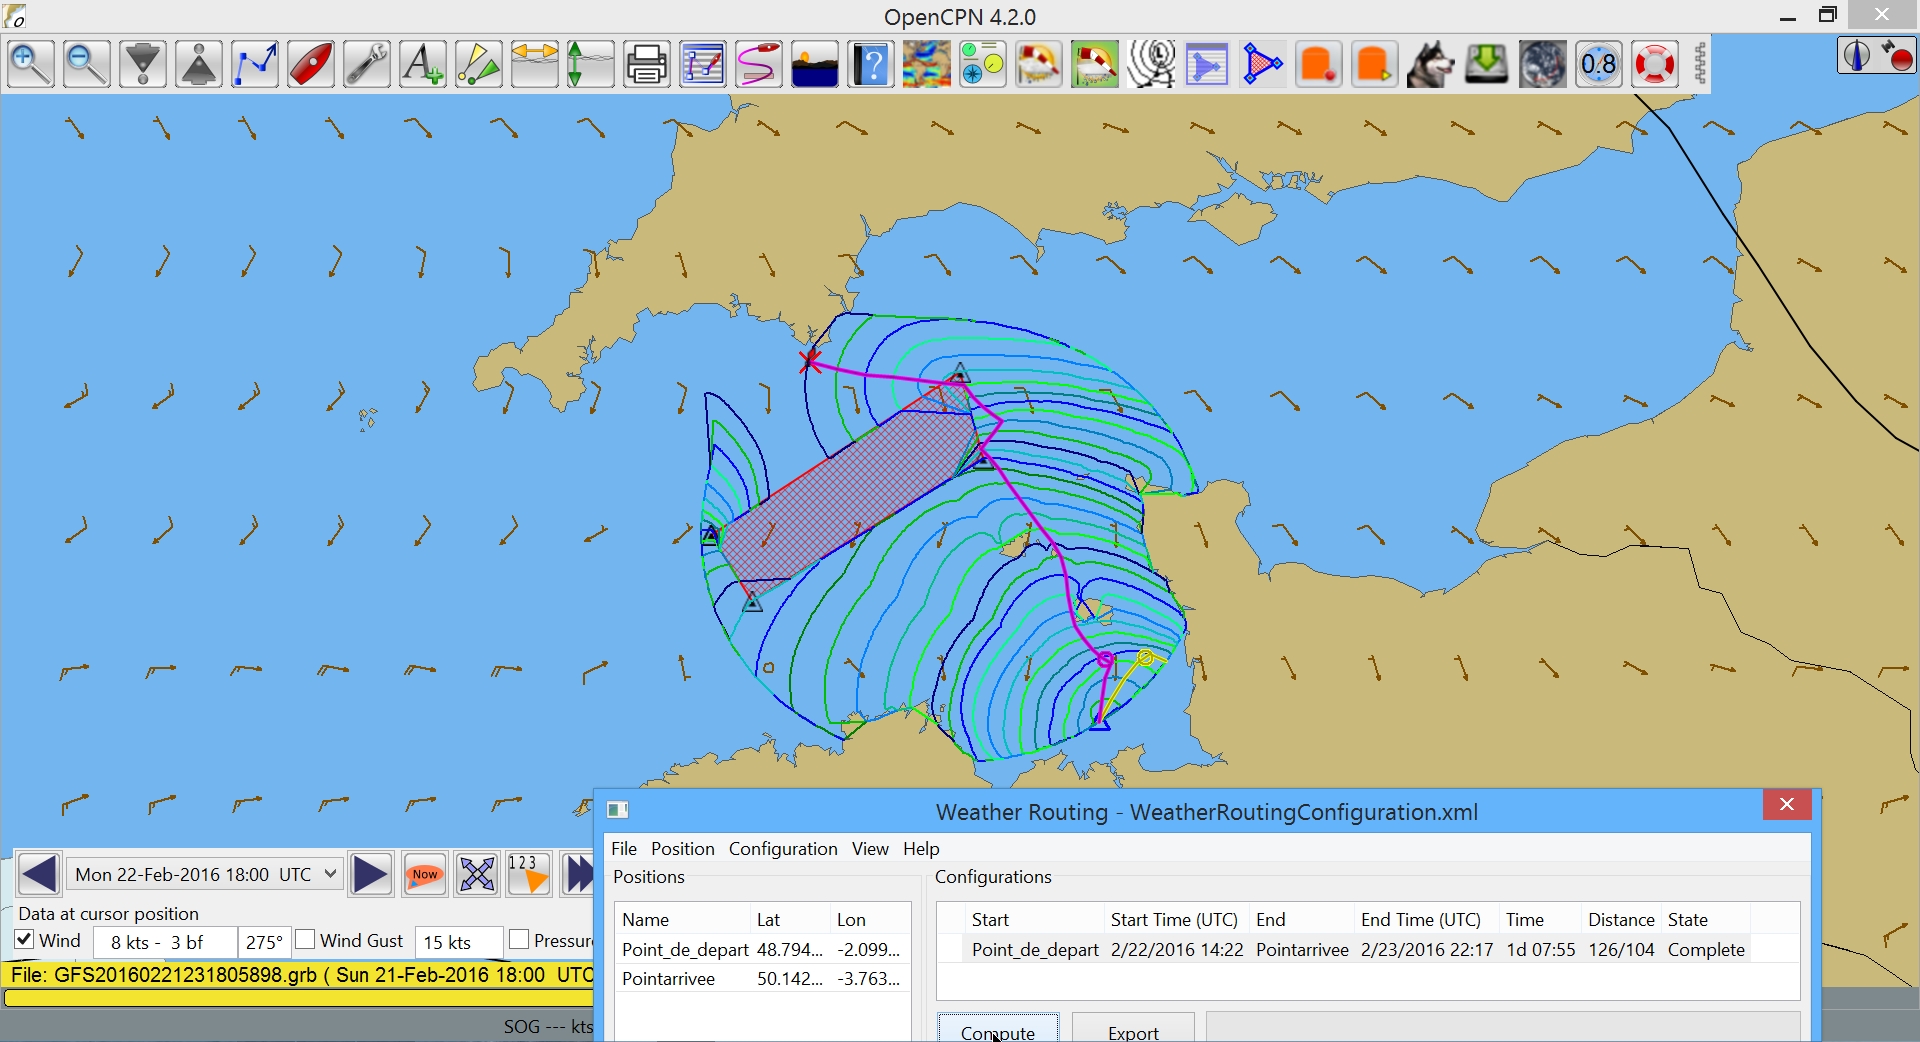
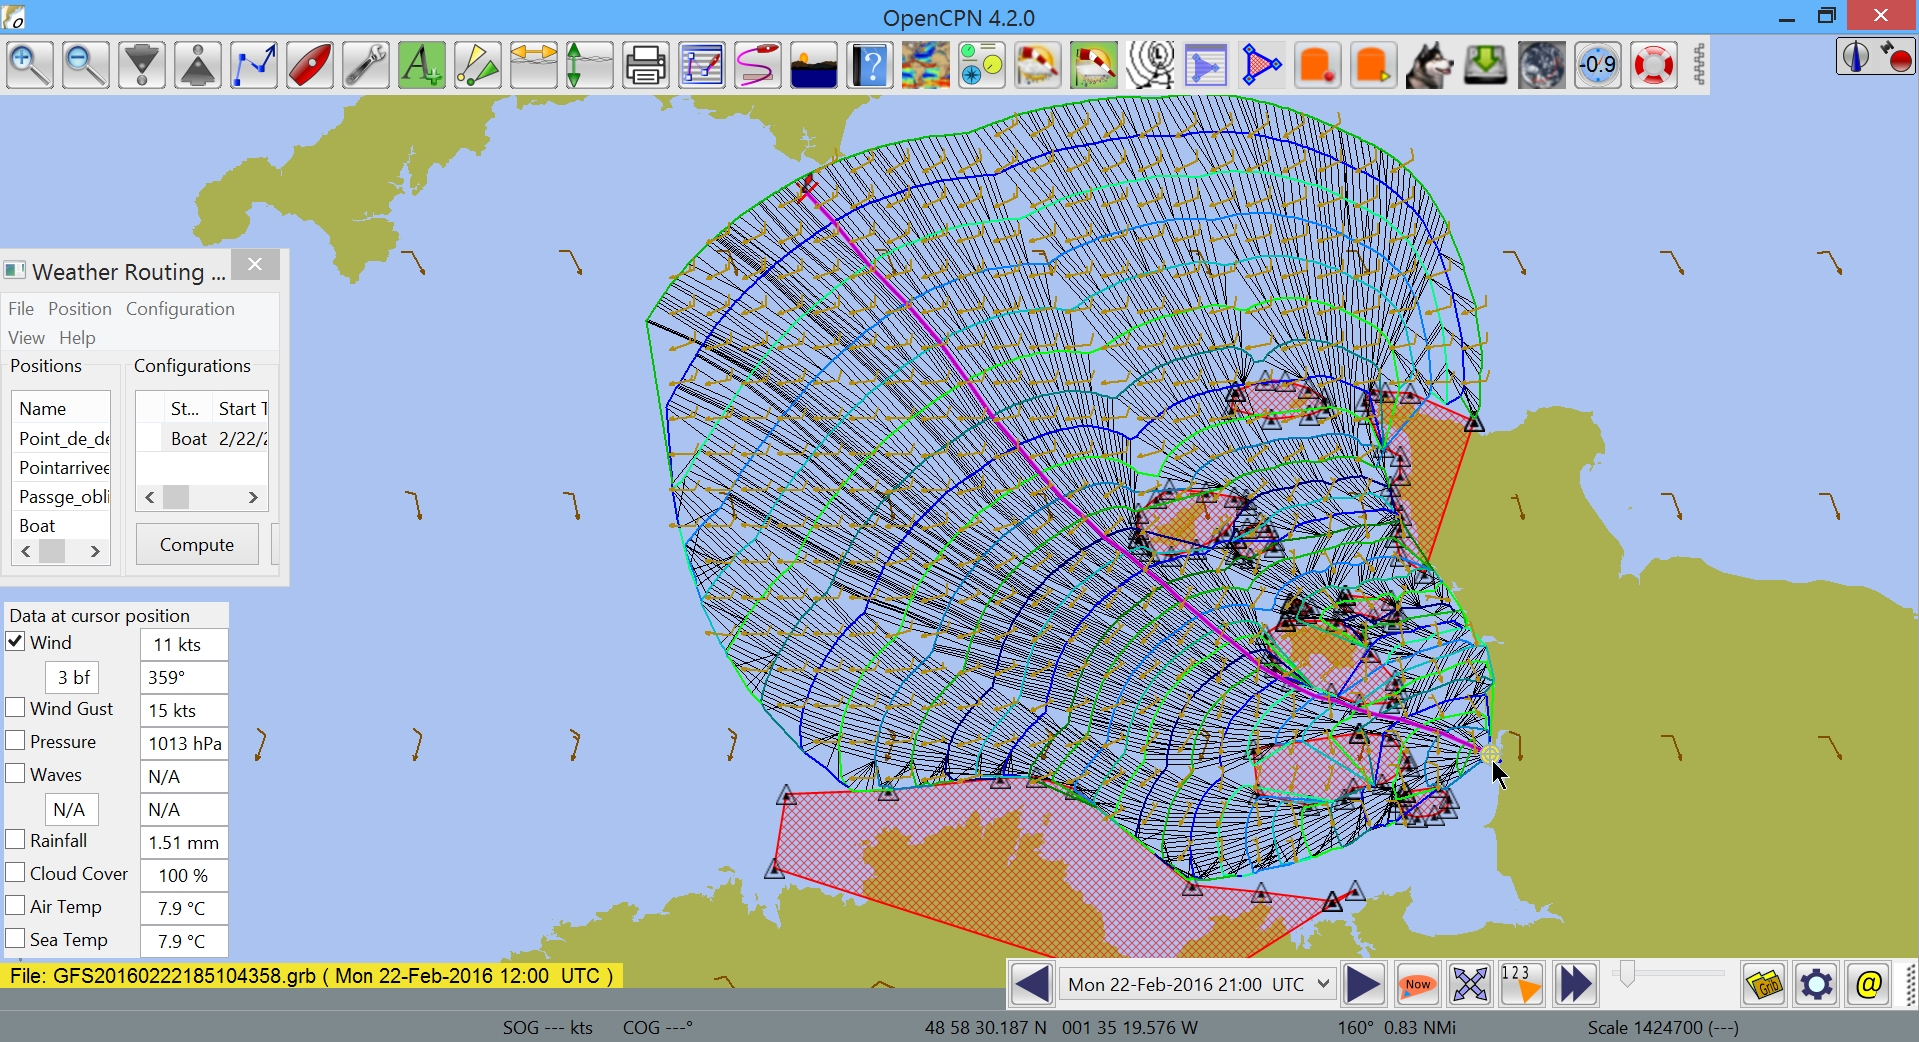
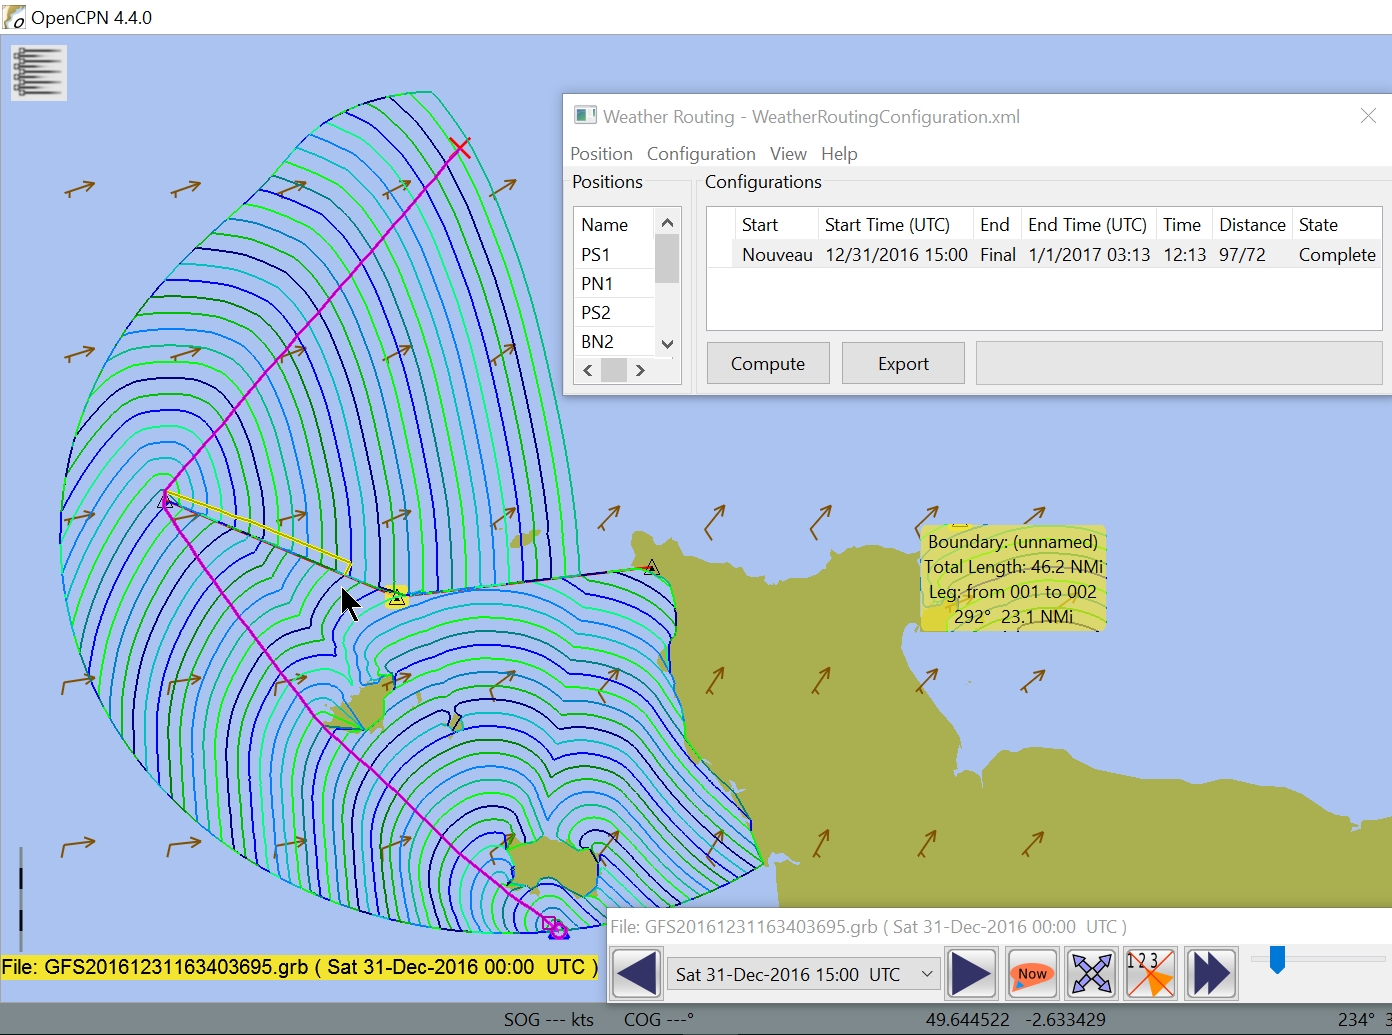
| 14° Mettre en place des zones interdites et des barrières de passage : |
|
Up |
|
|
 |
Up |
|
|
 |
Up |
|
|
 |
Up |
|
|
 |
Up |
|
|
 |
Up |
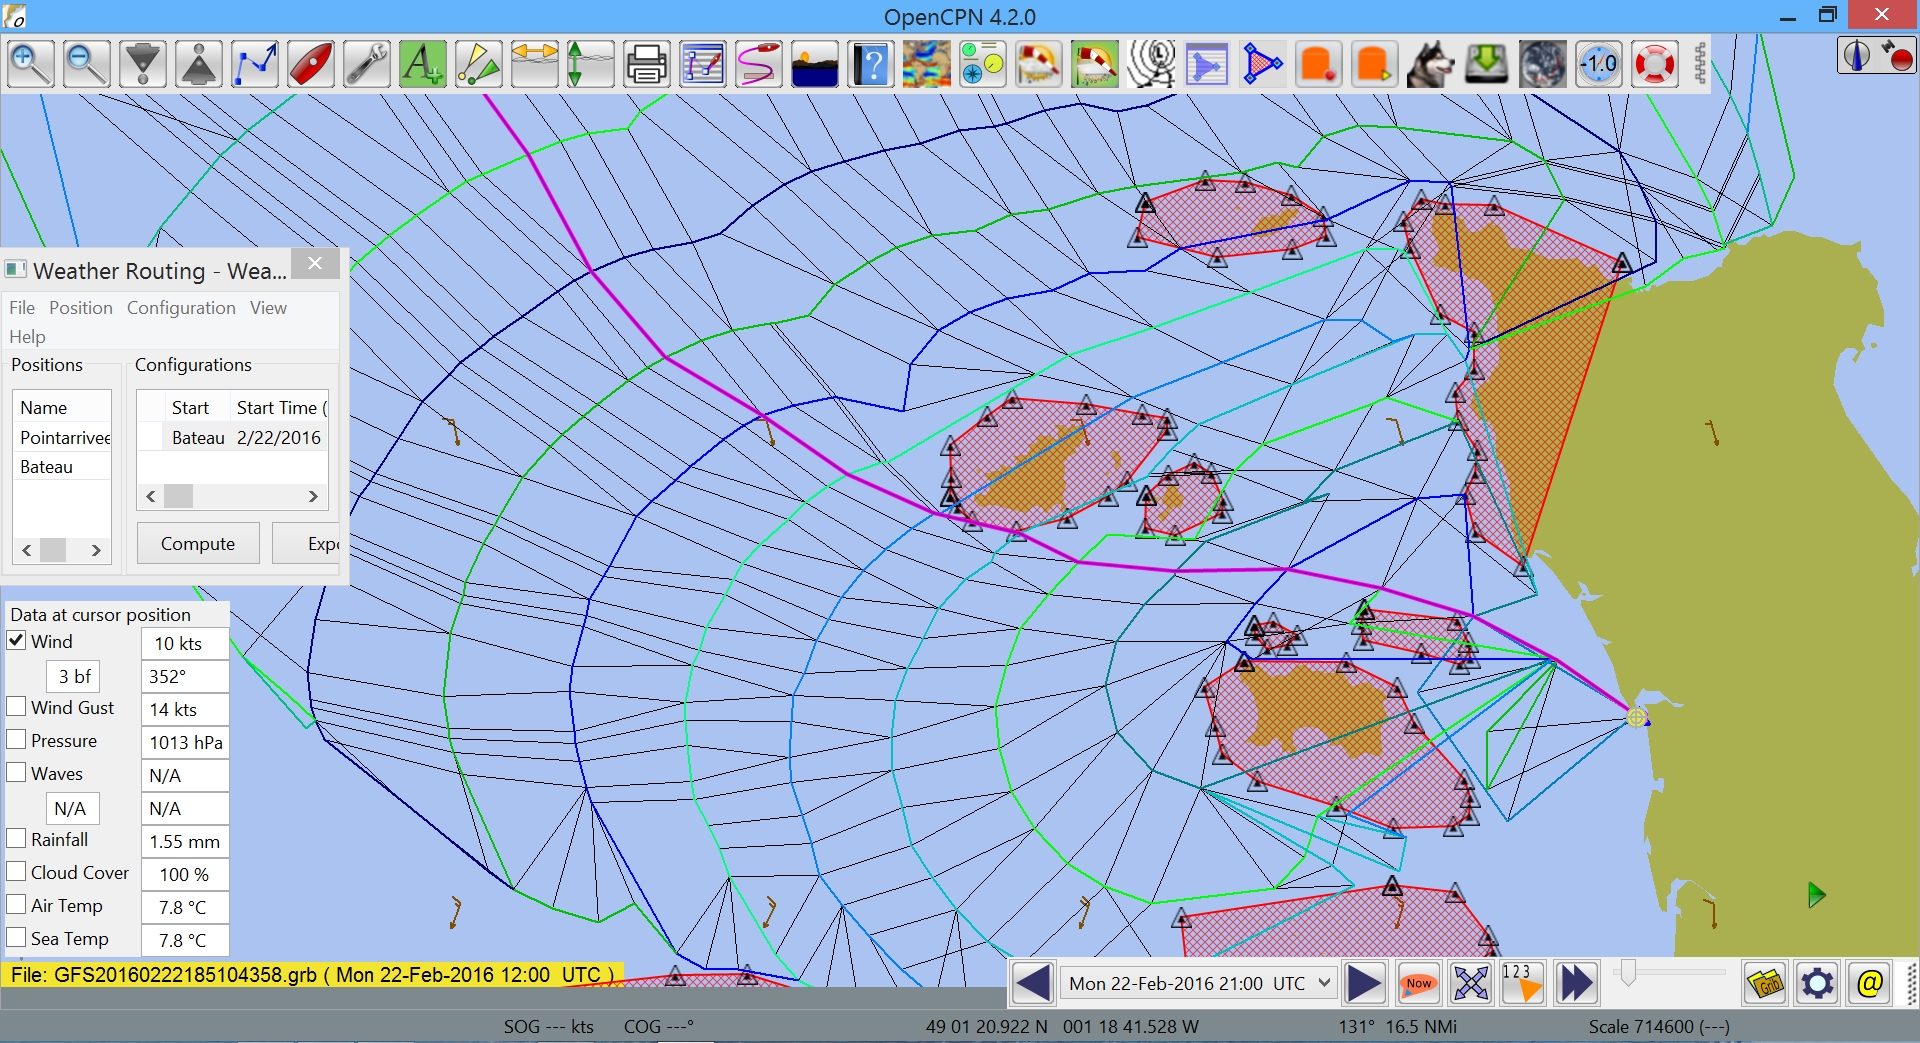
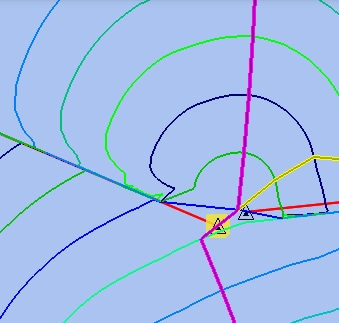
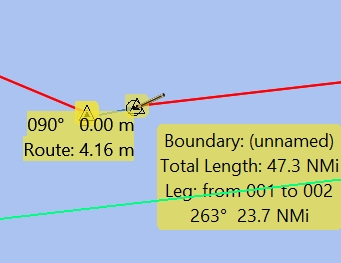
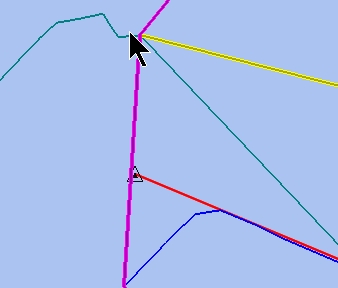
| 15° Et un exemple de barrière particulièrement instructif : |
|
Up |
 |
Up |
|
Up |
 |
Up |
|
|
|
 |
  |
Up |
 |
Up |
|
| 16° Encore deux exemples en Atlantique : |
|
Up |
 |
Up |
 |
Up |
| 17° L'item "Aide" de la fenêtre permanente : |
| Item
"Aide", Information, F1: |
|
Up |
| Item
"Aide", Manuel : |
|
Up |
| Item
"Aide", Au sujet de : |
|
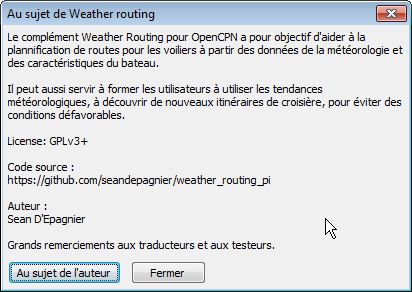 |
Up |
|
||
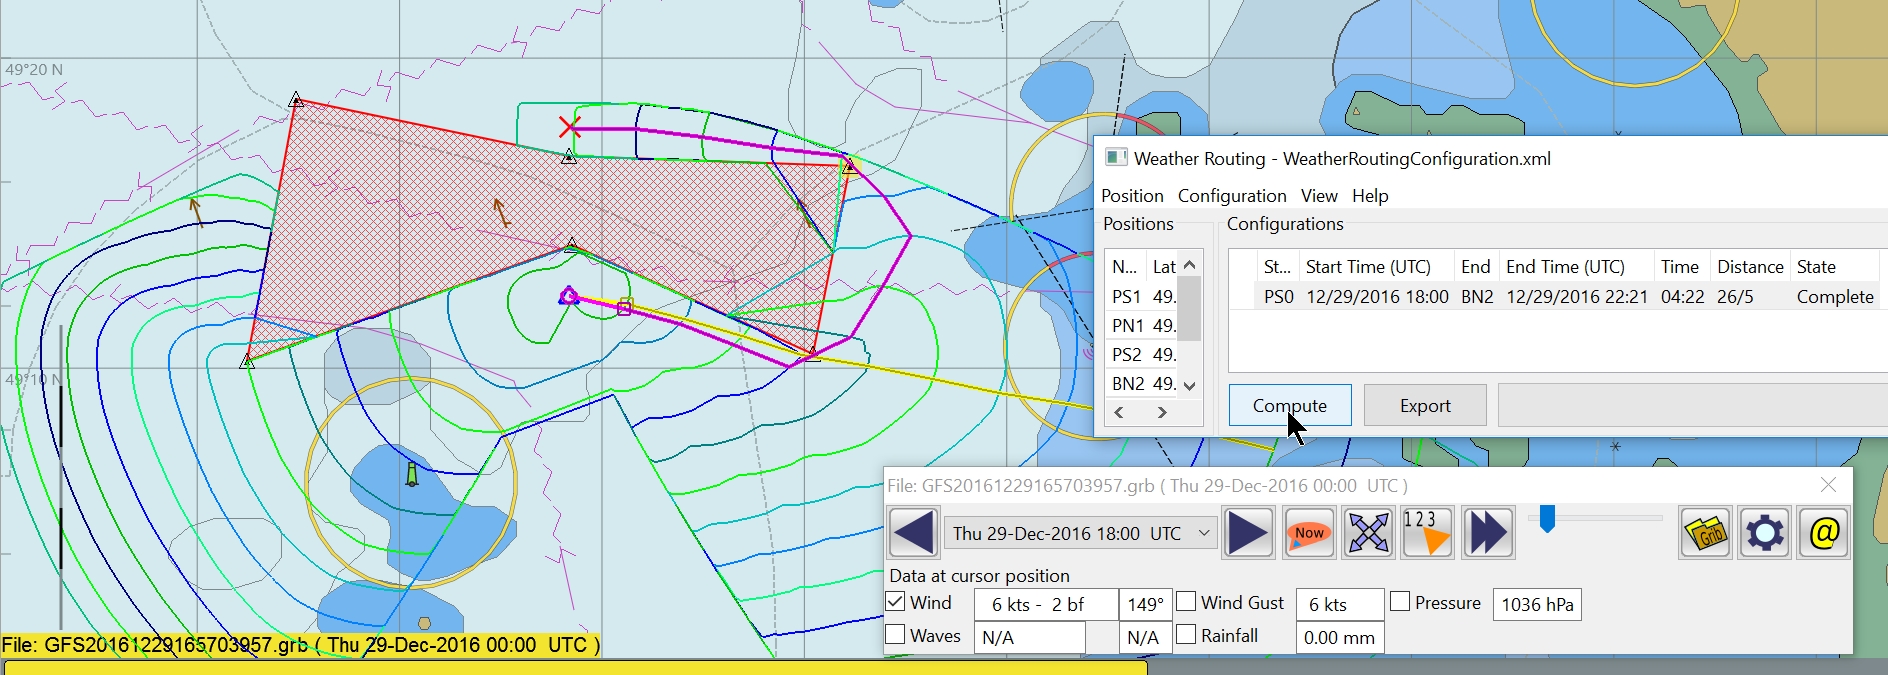
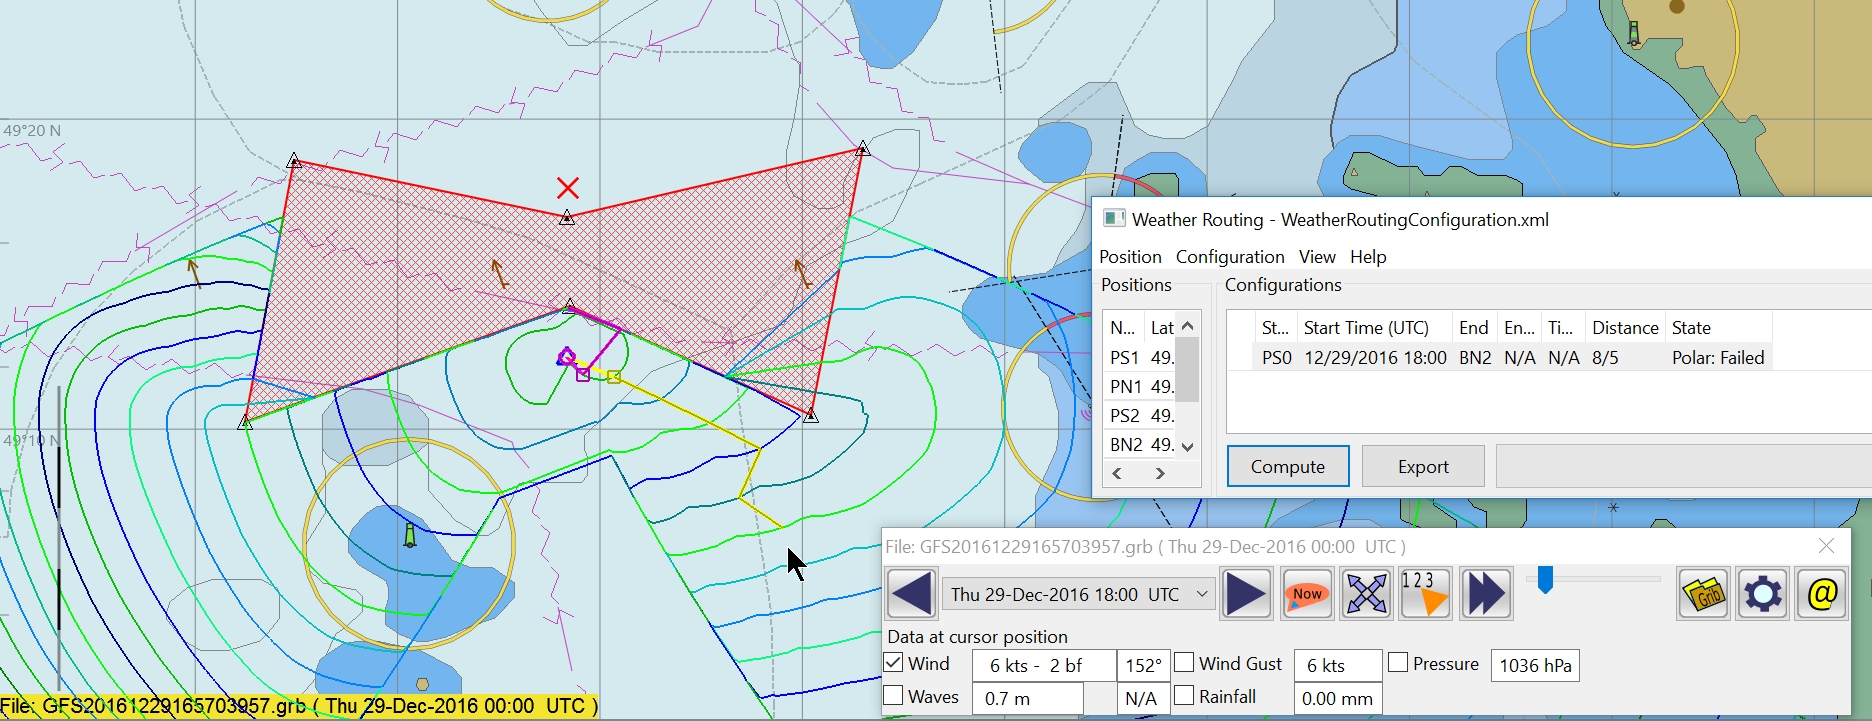
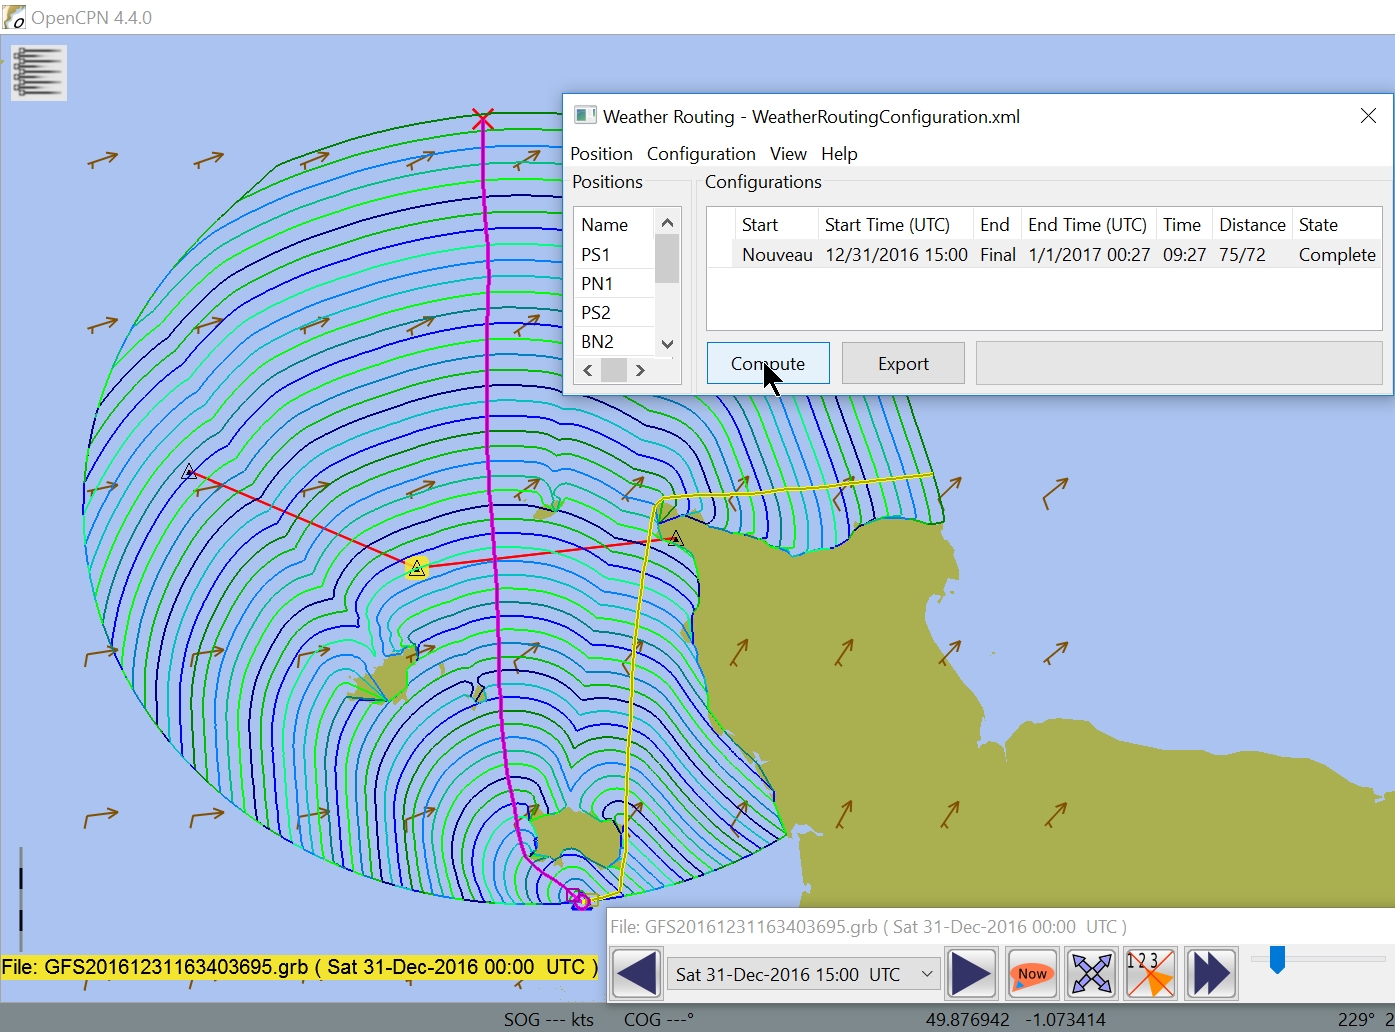
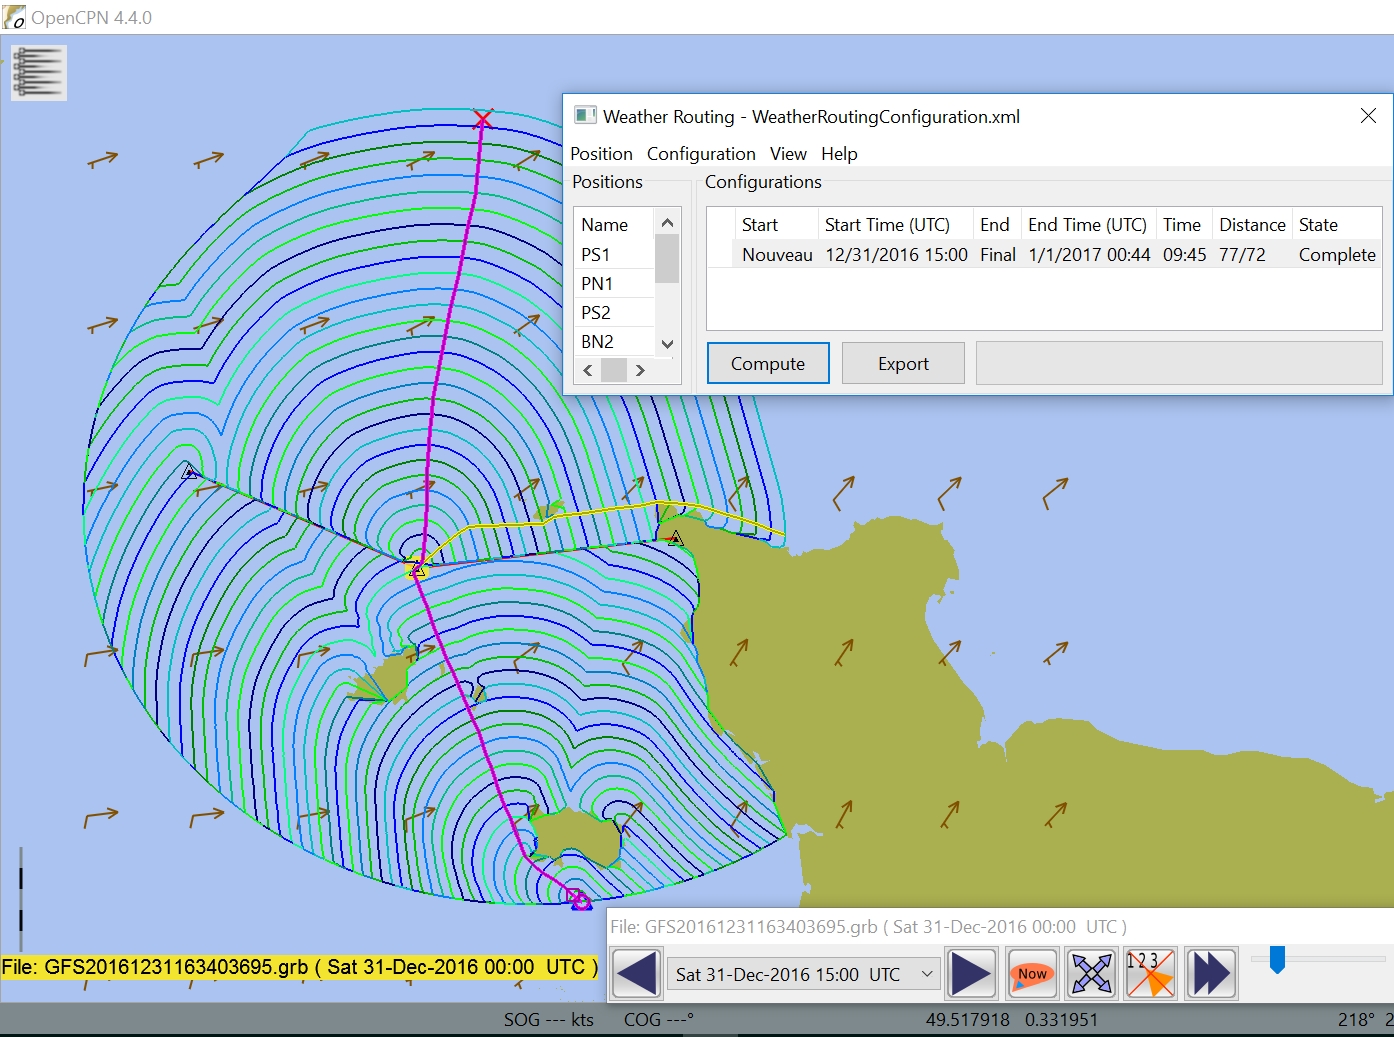
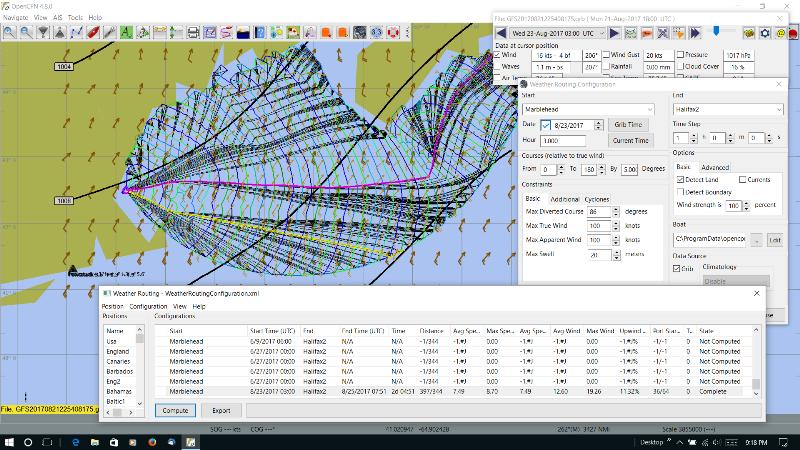
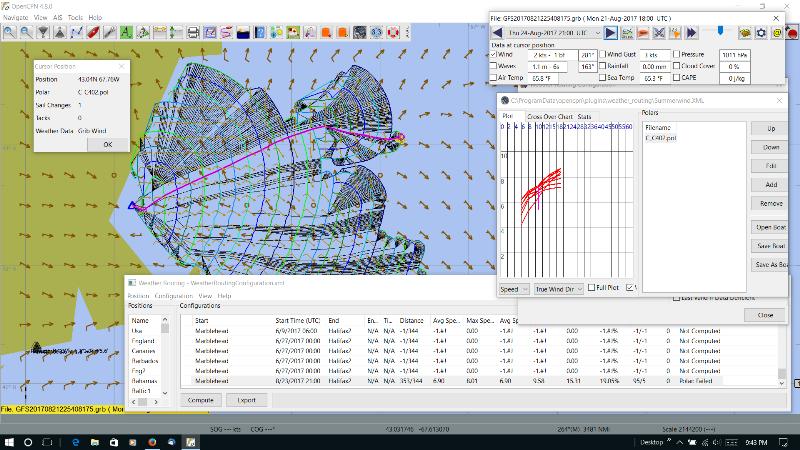
| L'anomalie "Polar failed" : |
| Au 2017/08/22, voici des infos utiles : A "Polar fail" can occur anywhere on the chart at any Time, due to a plethora of factors: 1. Light winds and no polar data for winds that light. 2. Heaviy winds and no polar data for winds that heavy. 3. Running out of time. 4. Cyclones in the area causing excessive winds. 5. Grib file has not wind data. "Grib Polar: Failed" 6. Grib file runs out of data. "Grib Polar: Failed" If "Polar Fails" there is a good reason for it, and our job is to figure out why. Here are some suggestions to help. 1. Open the View > Cursor Position menu popup so you can see what is happening. 2. Check the wind speeds in the area and time at which it fails by moving your cursor around and viewing wind speeds in Grib_pi. Move the grib_pi time back and forth to understand how the wind speeds are changing. Compare the speeds found to the Polar file! 3. In Try moving the Grib_pi Start Date forward a day or two, provided the grib file has that data, then in Weather_Routing Config pick "Grib Time" The try to Compute a routing. With Sean's help we got some of the polars that stop before completion of a full 1/2 heart. That look like the right image. http://www.cruisersforum.com/forums/...1&d=1497447402 working, by adjusting the start so the grib file would have adequate wind, or moving the start waypoint further along the track or adjusting the finish waypoint. By doing this we learn what the restrictions are. In short, there is nothing wrong with these polars or Weather_routing. They do what they are supposed to do. If there is not polar data from 0 knots of wind to 5 knots of wind, and the grib data has 2 knots in a area and time where the boat must pass, the "Polar: Fail" will occur! - If this happens change things so you understand, change the start or end point, change the date of start. Last resort check the wind available during the routing in the area where the failure is occurring. Here are two examples. The first one has "Polar: Fail" and the cursor was put right at the end of the routing that was haulted and is showing 2 knts. Please note the Polar to the right in Square "Speed" View. The Polar does not have any data from 0 knots to 5 knots. The second one has moved the date of the Grib file up to Aug 23 when there are better winds. And it has completed successfully. If a "Polar:Fails", it does not mean the polar is improperly formatted, it just means that most often the route cannot be run because the grib data does not fall within the wind ranges of the polar. The other suggestion Sean has made, is to try to have 2-3 of your boat polar files in the Boat.xml that cover the full gamut of winds. If you motor in winds from 0-5knots put a polar in that shows your motoring speed. If you sail best with full genoa and main from 5-18knts have a separate polar for that. Then have a couple of heavy weather polar files with different sail sets. Weather-Routing will use all of these Sail Sets, calculate crossovers and then show the sail changes on the route with a little square. The exact sail changes can be seen with the View > Cursor Location popup menu where the exact polar name being used is shown. Un "échec Polar" peut se produire n'importe où sur le graphique à tout moment, en raison d'une pléthore de facteurs: 1. Vents légers et pas de données polaires pour les vents qui s'allument. 2. Vents chauds et aucune donnée polaire pour les vents lourds. 3. Épuisé le temps. 4. Cyclones dans la région provoquant des vents excessifs. 5. Le fichier Grib n'a pas de données de vent. "Grib Polar: Failed" 6. Le fichier Grib manque de données. "Grib Polar: Failed" Si "Polar Fails", il y a une bonne raison, et notre travail consiste à comprendre pourquoi. Voici quelques suggestions pour vous aider. 1. Ouvrez le menu Affichage> Menu de position du curseur afin que vous puissiez voir ce qui se passe. 2. Vérifiez les vitesses du vent dans la zone et l'heure à laquelle il échoue en déplaçant votre curseur et en regardant la vitesse du vent dans Grib_pi. Déplacez le temps grib_pi d'avant en arrière pour comprendre comment la vitesse du vent change. Comparez les vitesses trouvées dans le fichier Polar! 3. En essayant de déplacer la date de début de Grib_pi vers l'avant un jour ou deux, pourvu que le fichier grib contienne ces données, alors dans la configuration de Weather_Routing, choisissez "Grib Time". Essayez de calculer un routage. |
Up |
 |
Up |
 |
Up |
| Aller au Tutoriel_PC.htm | |
| Haut de page |
| Copyright
: Ce site web est protégé contre toute utilisation
commerciale. Dernière modification de cette page : |